Well, about a month ago I noticed that the coolant in my Dodge Neon looked kinda funky. It had this rusty brown appearance, and it hadn't been changed for a couple years, so I just took it in and had the cooling system flushed. About a week later, I checked it again, and it had gone from nice clear green to that same muddy brown. It also felt greasy. So I started to think that maybe the head gasket was going, and started shopping for a new motor, since in my experience it is more time-effective to do a motor swap than a teardown, gasket change, and reassembly.
Friday the following week, I start the car and head up the block, and suddenly the transmission isn't engaging. I coast backwards to my parking spot, and the trouble is pretty clear pretty fast: The ATX is out of fluid, and all of the fluid seems to be in the cooling system. The only place those systems cross is in the radiator, so it seems obvious that the ATX cooler has blown and spewed ATF into the cooling system. I was actually releived that the problem was that simple. So I hose out the cooling system, change the radiator on a long lunch hour, and I'm good to go, right?
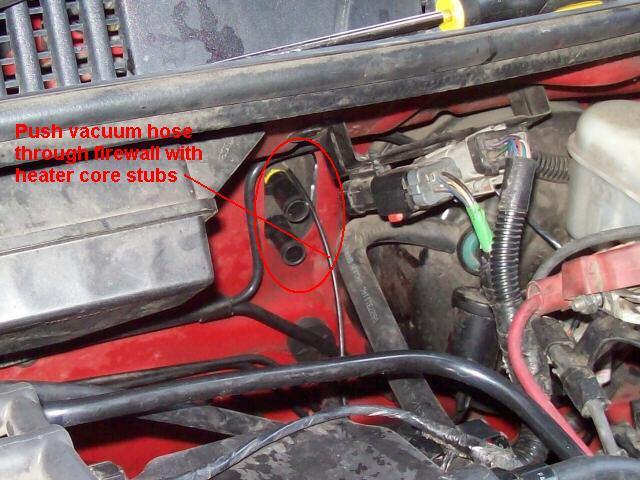
Not so fast. About two weeks later, the air from the heater starts getting that sweet smell of ethylene glycol. Maybe it's just residue from when the ATX forced all the coolant overboard out of the reservoir overflow, I thought. The overflow outlet is right next to the heater core stubs that go through the firewall, and maybe some of it leaked into the HVAC box past that foam gasket around the stubs.
Then it really started losing coolant, and steam was coming out the air vents, and then it took two gallons of coolant to make it home on my 150-mile weekend commute. When I checked, the HVAC drain hose was running a solid stream of liquid overboard. That could only be a heater core, and the most reasonable conclusion is that the ATF dissoved the rubber seal between the header and the finned body of the heater core.
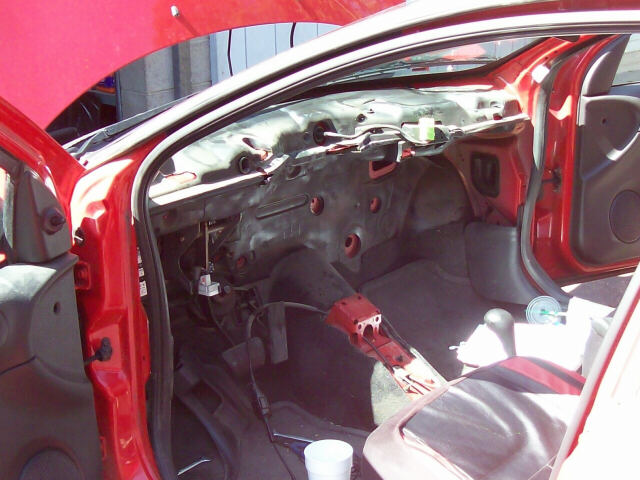
And then my heart sinks, because the HVAC system is one of the first things to go into the car body as it came down the line in Belvidere, Illinois. Not the first thing, of course, but it goes in before the dash and interior and engine. Getting the HVAC unit out is basically a "pillar to pillar" job; everything between the two A pillars has to come out first, and then you have to open up the HVAC box to get to the heater core.
I call around and get two quotes on having someone else do the job. Both of them seem to be based on the same references; they're both within about five dollars of each other, both right around $800. That's a fair price for that much labor, and for the risk inherent in assuming the responsibility for having everything work correctly after the job is done. But it's somewhat above my threshold for a job that I'm pretty sure is a day's work.
One of the quotes is from the mechanic who is also the landlord for my composites shop, and he agrees to evacuate the R134 refrigerant from AC system for me if I want to do the job myself. And when I get there to have that done, he's printed out the dashboard and HVAC removal and installation procedures for me. Now, how cool is that?
So I decided to go ahead and do the job myself. I figure that there were two guys in Belvidere who made about $25 per hour each installing one HVAC and one dashboard every minute, so that's only about $5 to install both of them. How hard can it be to remove both of them?
That's a joke, of course. Those two guys had special tools and special training, they didn't have to deal with all those interior trim panels and wiring harness connections, and they didn't have the engine getting in their way.
Nonetheless, these cars are designed for pretty low-hour assembly and a lot of their parts just snap together and unsnap apart, so I though that the job looked kind of doable. I figured that if I can manage to change the timing belt and the radiator, doing the heater core in a day was likely within my grasp. And just in case, I'd start the job on a Saturday and so have all day Sunday if things took longer than expected.
I started out by studying the Chilton manual, and also studying the service procedures that my mechanic had printed out for me. From that, I formulated a basic plan of attack and a few basic ground rules.
The first rule was not to go too fast. If I went too slow, the job would take more than one day and I'd end up losing part of Sunday as well as all of Saturday. But if I went too fast, I ran a much greater risk of doing things out of sequence, losing parts, breaking parts, or otherwise having to backtrack or even get shut down while I scrambled to replace something I'd messed up. That could set me back several days or even a week.
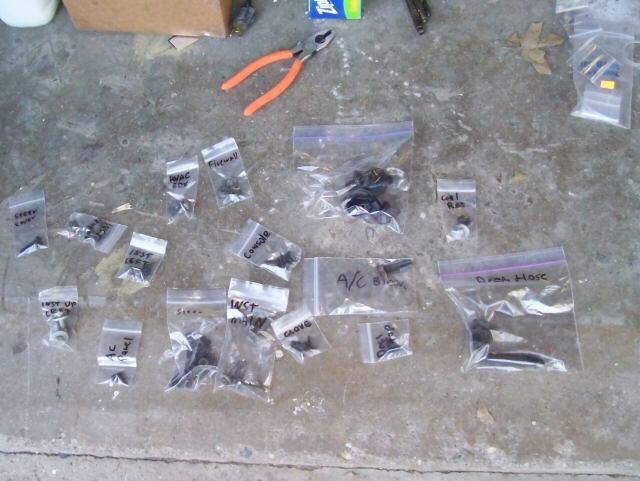
The second rule was to organize every single part that I removed. Everytime I removed a part or an assembly, all of the hardware that secured it would go into its own baggie, and every baggie would get a unique label.
The third rule was to try to understand the why of each procedure in the manual, not just the what. That helped me to anticipate situations not covered in the manual, and to find solutions before they became problems. For example, neither of my service references covered the ATX shift lock cable. But when I went to remove the steering column, it was clear as day it wasn't going anywhere until I found some way to disconnect that fat black cable.
One of the reasons that I hate doing dash work is that dashboards are rarely as quiet after you've messed with them. Loose dashes tend to squeak when you go over bumps, especially if you've got tight suspension. And few things annoy me as much as interior squeaks. However, once it was clear that this job needed doing, I was pretty sure that I was no more likely to make it squeakier than your average mechanic. And if I did make it squeak, at least I would have gotten the skills and experience I needed to put it right.
So, I dived into the job. I started at about 10:30am on Saturday, and had the dash out when we broke for lunch at 12:45. We returned to work around 1:30, removed the HVAC unit and swapped out the leaking heater core, and had the HVAC unit back in the car around 2:30. The dash was in around 3:30, and at about 5:15 I had the steering column in and all of the wiring harnesses reconnected. The job was basically done at 5:45; the only outstanding items were to change one light bulb in the HVAC control panel and to have the R134 re-loaded into the AC system.
Essential tools: It took a Torx T30 to disconnect the AC connectors, but the vast majority of the fasteners were garden-variety stuff. All of the interior screws were #2 phillips head. All of the sructural bolts were either 13mm or 10mm hex, and for most of them I used my little 1/4" drive socket set. A 10mm ratcheting box end would have been handy for the nuts on the firewall, but a standard box end did the trick. One of the handiest tools I had was one of those forked trim sticks for pulling out those ribbed-post fasteners the factory guys just poke into holes in the body. The trim fork was really handy for removing the fuel line bracket from the the right-most HVAC stud on the firewall.
The usual disclaimer: If you take on this job, you are solely responsible for not screwing up and getting hurt and possibly killed. You disconnect and then reconnect essential parts of your car's steering. You work with poisonous chemicals. You remove and reinstall explosive airbag components and their control wires. If you do the job properly, the actual danger is very minimal, although you will almost certainly get minor cuts and abrasions along the way. So don't screw up. And if you do, you cannot say I didn't warn ya.
The photos that follow are not intended as a step-by-step how-to guide. They do not replace the factory service guides. They are merely a supplement to those guides, and offer proof that a person of reasonable skills can do this job in a day, and they offer a few tips and pointers to make the job a bit smoother. Also, note that I took few photos after everything was disassembled. I know that repair manuals (even ones that I've written) use the phrase way too often, but for most of this job the reassembly really is the reverse of the disassembly
The photos:
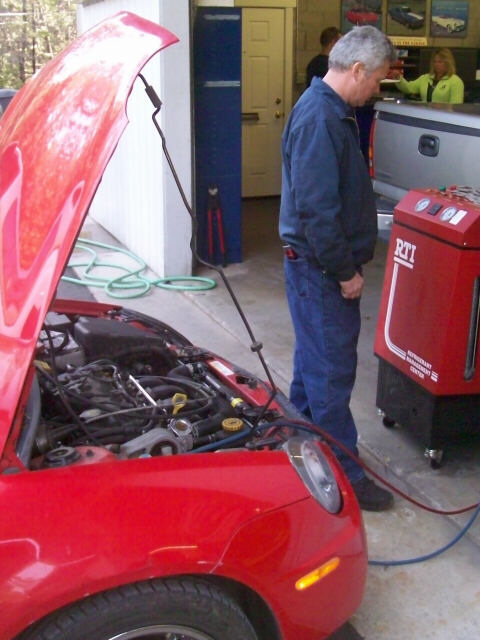
The day before the big job, my mechanic evacuates the AC system. I don't know how much R134 is supposed to be in there, but he took out 16 oz.
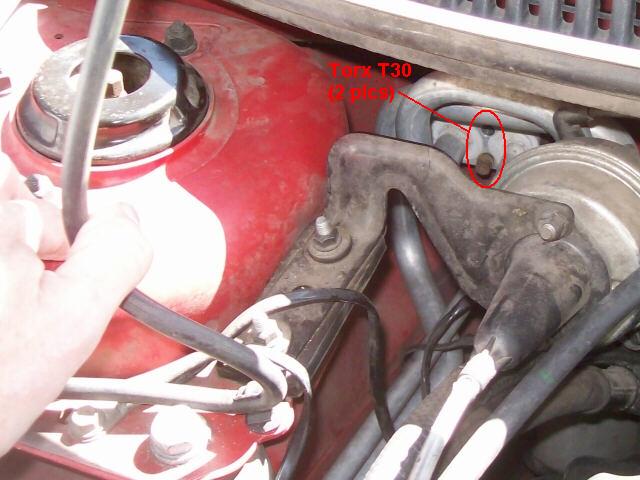
The next day, I start work. The first thing I do is disconnect the AC connection block on the right side firewall. These are two Torx T30 bolts. I chose to start here in case I needed to drive to the store and get a better T30 tool than I had; that proved to be the case. Fortunately, it was the only hardware store trip all day.
To get the dash cover out, you start by popping the A pillar covers off (no photos). It's easiest to get the pillar covers out if you pull the rubber weatherstripping free from the top of the plastic cover down to the corner below the lower door hinge. You'll need the weatherstripping off down there to get to the dashboard bolts anyways.
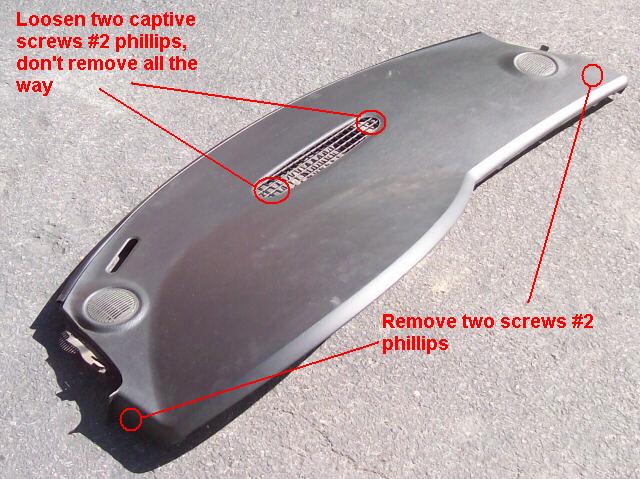
Then remove the two phillips screws at the left and right edges of the dash cover, and loosen (but not remove) the two screws inside the defroster outlet grill. Then you tug the cover up to unsnap its clips, and draw it aft to remove. It's that easy! Note that there are a pair of alignment pins molded into the underside. Pay attention to them on reassembly, they go through holes in the top of the dash assembly.
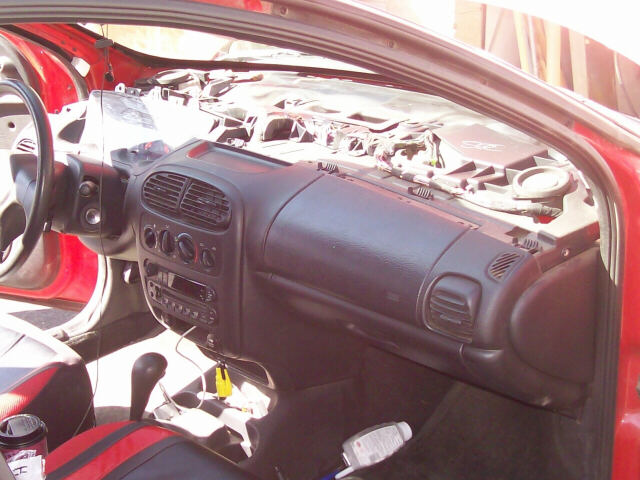
Here's what it looks like with the dash cover removed. It may look crazy, but way weirder stuff is coming.
Now is a good time to disconnect the battery. Since you need access to the heater core stubs, you might as well take the battery all the way out. Regardless, you definitely must disconnect the battery to safety the airbag system.
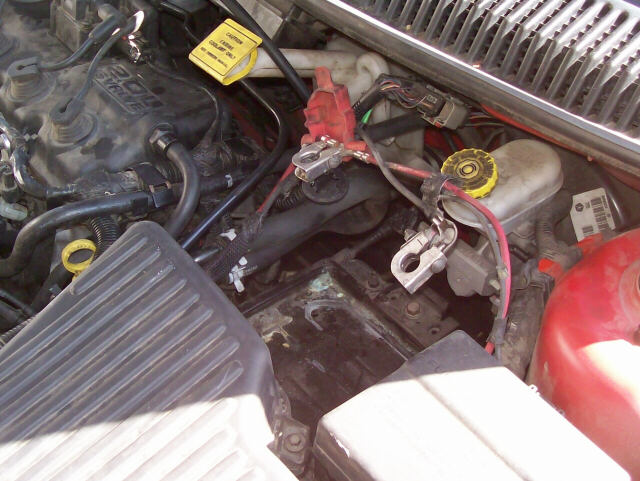
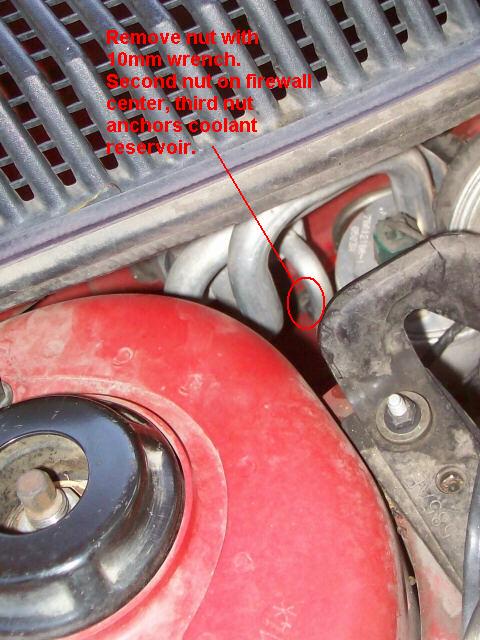
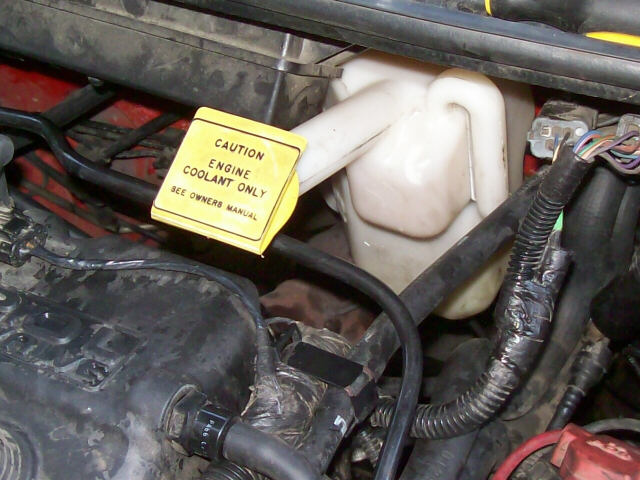
This photo of the coolant reservoir shows the location of the two fasteners that secure it. The one that goes through the tab upper left (right side of car) is a sheetmetal screw, the one for the lower right (left side of car) is a nut on a stud; that stud is one of the three studs that secures the HVAC box to the firewall, and has a second nut on it below the coolant bottle nut to secure the HVAC box.
Removing the instrument cluster bezel. Drop the tilt wheel to its lowest position and just give the bezel a tug aft and it unsnaps. For this job you can leave the gauge cluster in, though this might be a good time to swap in your SXT cluster with the tach and the cool white faces. While the bezel was out I took the opportunity to clean the clear plastic lens, and even gave it a coat of protectant wax to make it look like new.
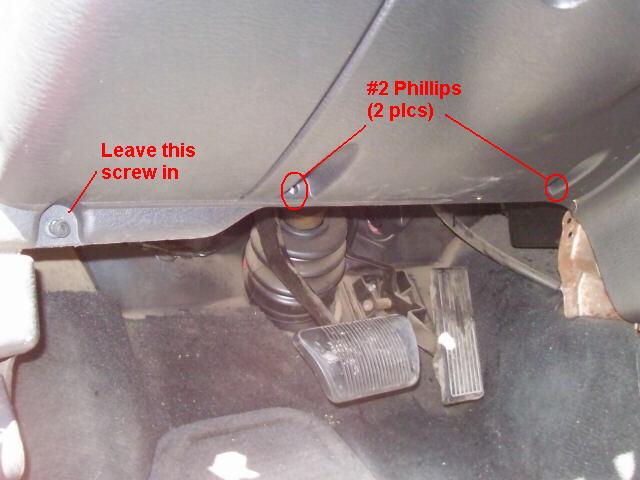
Removing the dash cover below the steering wheel. Leave in the screw on the left, it just secures the plastic to the dash frame and you're taking both out together anyway.
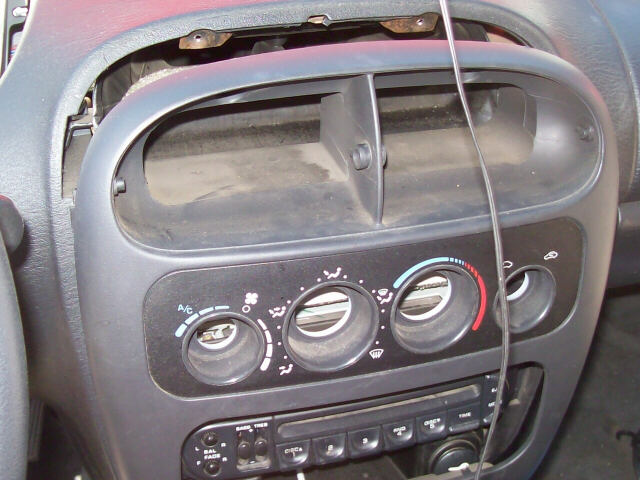
To remove the dash center bezel, you pop the two vent outlets out and remove the two screws behind them.
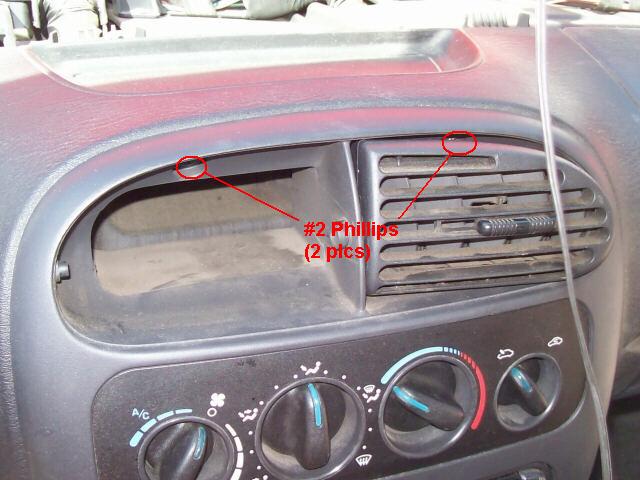
Then you remove the four HVAC knobs and pop the bezel out. Gotta love these snap-together cars!
Then its time to remove the glove box. Take out the three screws along the bottom edge, then unlatch the glovebox. To release it from its opening, squeeze the sides inward so the snubbers go through the opening (sorry, no photos).
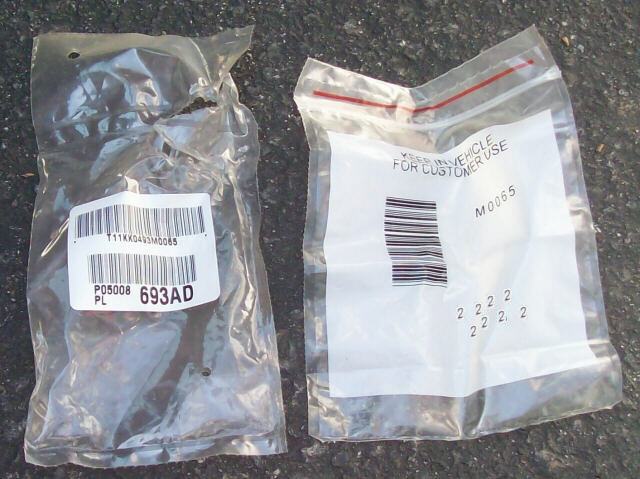
After removing the glovebox, I found these baggies tucked into the space between the glovebox and the HVAC box. The one baggie says to leave it in the car for customer use. They did, and if I'd known it was there I would have found a use for it.
Remove the steering column covers by taking out the two phillips screws that hold them together. It's a bit of a fight to get the lower cover clear of the tilt wheel release, but it may be easier if you pull the tilt release lever down.
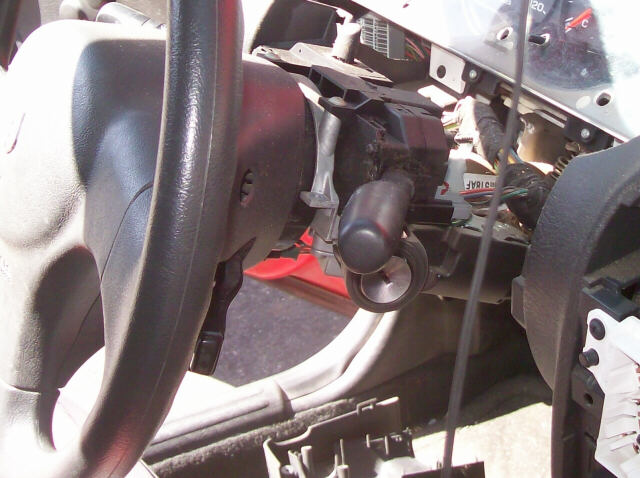
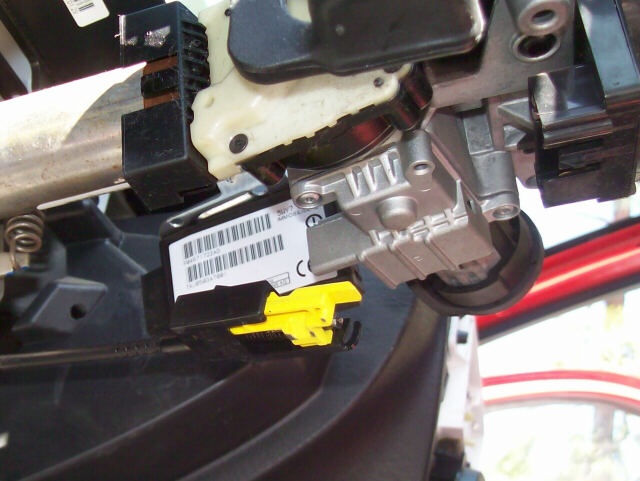
Disconnect all of the connectors on the wiring harness that snakes up and around the steering column. There's six or eight connectors along its length for the shift lock cylinder, the RFID SKIM key sensor, the ignition switch, the turn signal, the cruise control, the wiper stalk, and maybe one or two others. All of the connectors except on the lock cylinder are typical Chrysler red-tab thingies. The idea is to free the column from the wire harness so that you can remove the column but leave the wiring harness with the dash.
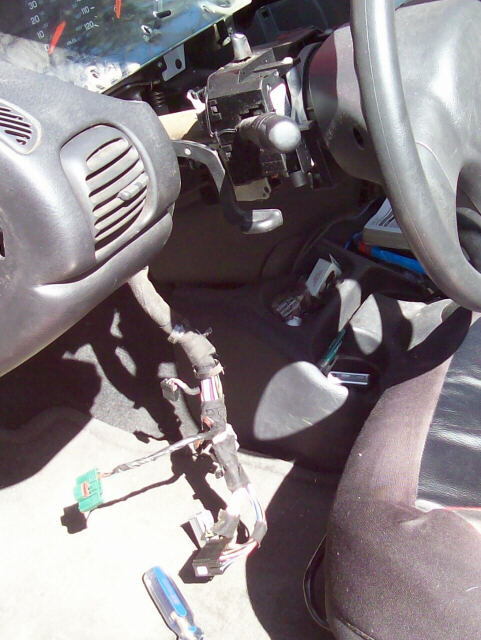
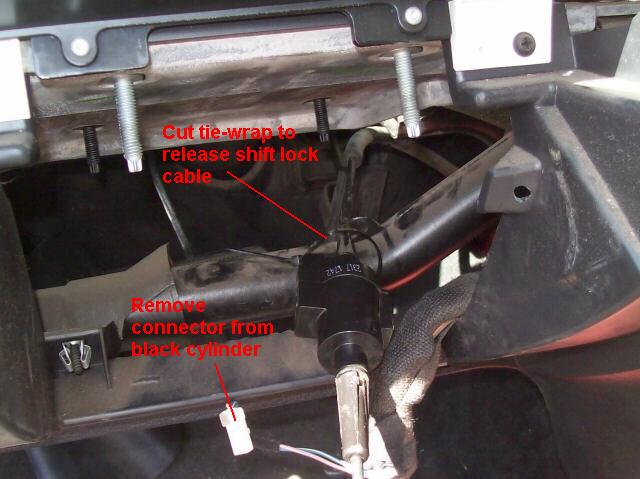
Here's something they don't cover in the book: Removing the ATX shift lock cable. The secret is to switch the ignition to on while pressing the black tab on the top. Then slide the square black housing forward out of the ignition switch housing.
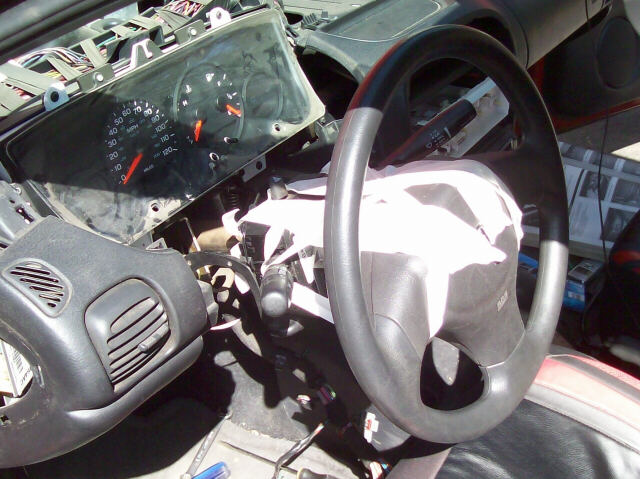
After disconnecting the steering wheel from the U-joint, resist the temptation to give it a couple of spins. The "clock spring" cable between the column and the airbag only goes so many turns each way, and if you add a couple turns to it you might run out of cable the next time you steer to lock. So keep the steering wheel centered after disconnecting the U-joint, and maybe tape them together so nobody messes with them.
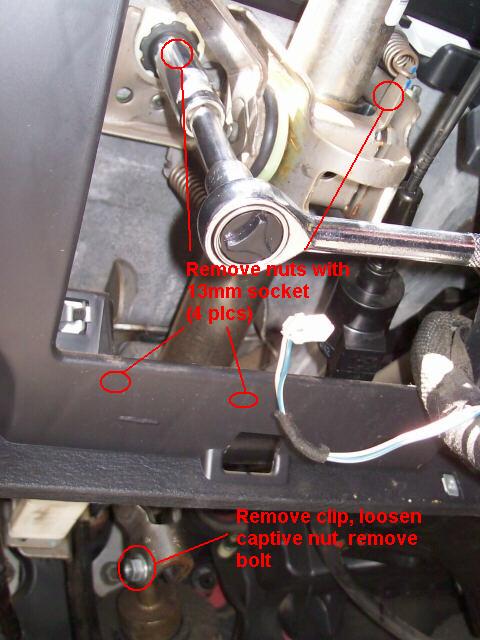
The steering column is held onto the dash frame with four serrated nuts on log studs. The steering shaft is secured to the U-joint with a special bolt and a captive nut; the nut is safetied with a small clip. Remove the clip, loosen the nut, and remove the bolt (the nut stays with the yoke on the shaft).
The steering column, removed. Note the masking tape that prevents it from adding any turns to the "clock spring" cable.

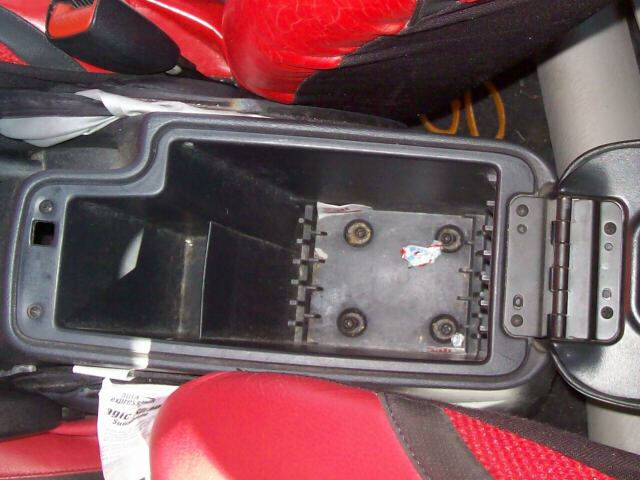
You have to remove the center console in order to get at the wiring harness that runs back past the shifter to the parking brake. Remove these four phillips screws, and two others in the right and left cup holder wells. then lift the center colsole out of the car. You'll have to try the gear shift and handbrake in a couple different positions to get them through their holes in the console.
With the console removed, loosen every connector along the center console wiring harness, including the gear indicator light (ATX only). You also need to remove all the plastic ribbed-post retainers that secure the wiring harness; a trim stick is perfect for that. That wiring harness will come out with the dash when you remove it, so you want it all free.
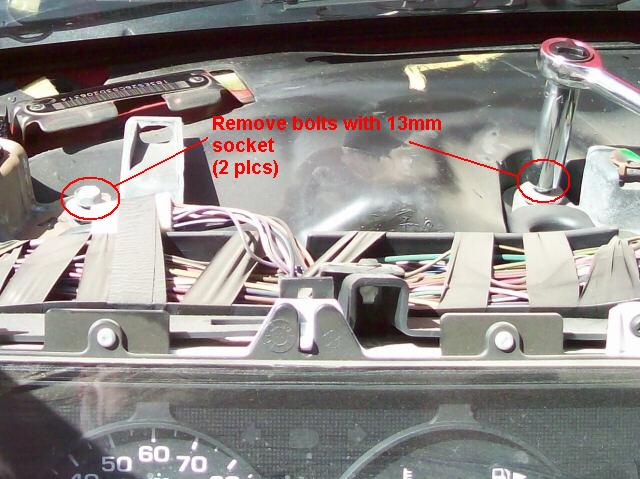
The dash is secured on top in front of the driver with these two bolts, remove them with a 13mm wrench or socket.
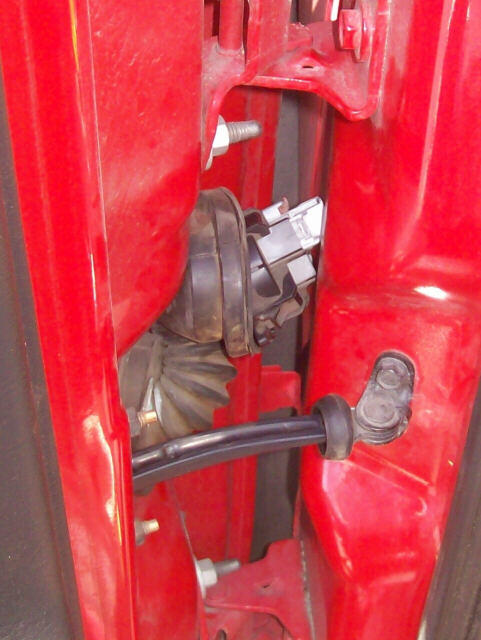
You also need to remove both the right and left connectors that go to the door harnesses. The trick to disassembling these is to pry back the rubber boot to expose the black oval connector body. Then depress the tabs in the "corners" of the oval, and then pull the connector body out into the narrow space between the door and the A pillar. Then you can undo the red-tab connector from the inside of the connector body. Be careful not to smash the black connector body by closing the door on it while it's out of the A pillar.
When its time to reconnect these wires, the trick is to first wrap the rubber boot around the black connector body. Then you plug in the gray connector that's on the wiring harness from the dashboard and slide the red tab to lock it, and once the wires are connected, only then do you snap the black connecter into the A pillar. If you try to get the rubber boot engaged with the black connector body after it's snapped into the pillar it will probably take you an hour per door and it still won't be properly engaged.
On the right side, you have the same A pillar door connector as on the left, and also the antenna connector. Pop the plastic trim cover off so you can get to the antenna connector.
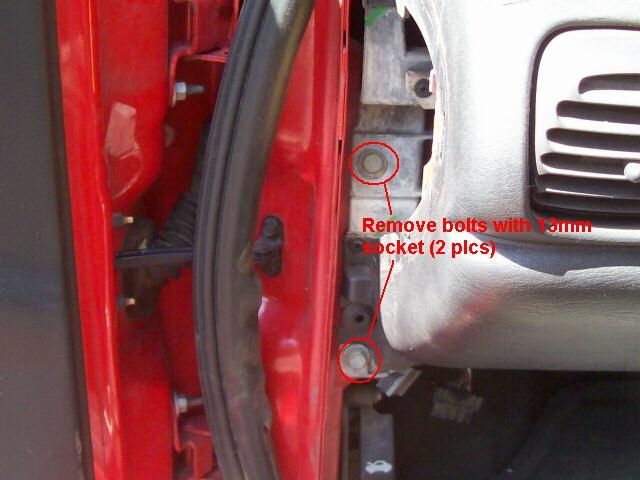
The dash is secured on the left and right edges with two bolts with 13mm heads at each edge. Note how I've pulled the weatherstripping away to get a clear shot at the bolts. When you put these bolts back in, try to move the dash around as necessary so that the bolts go back on the shiny marks from their original factory installation.
Disconnect these two red-tab connectors between the dashboard and the HVAC unit, located a bit to the right of the center top of the dash.

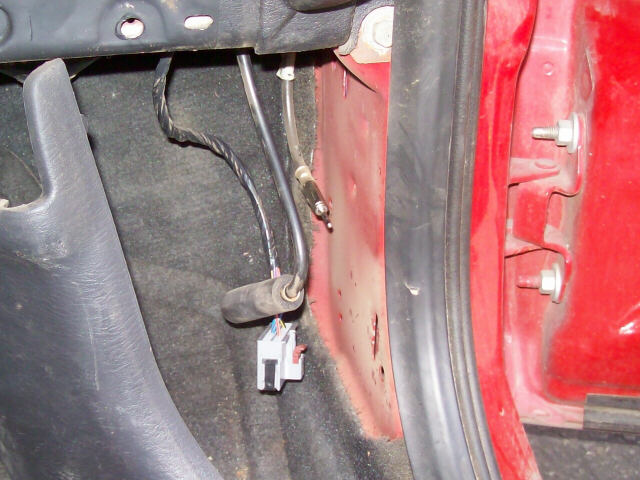
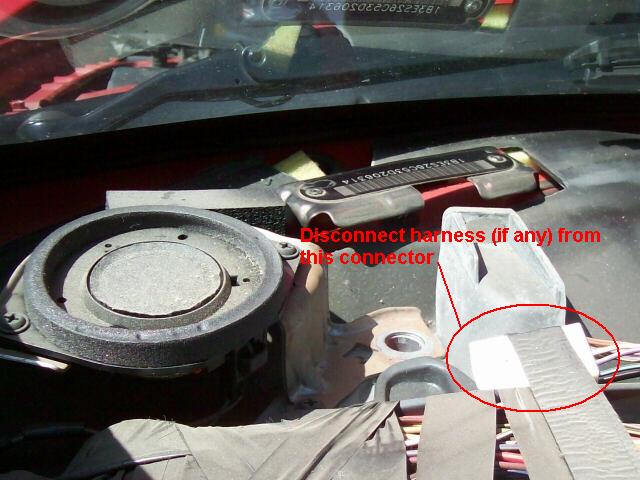
If there is a wiring harness attached to the white connector just aft of the VIN plate, disconnect it. I don't know, but I'd guess that it's probably for the power mirrors, which my car doesn't have.
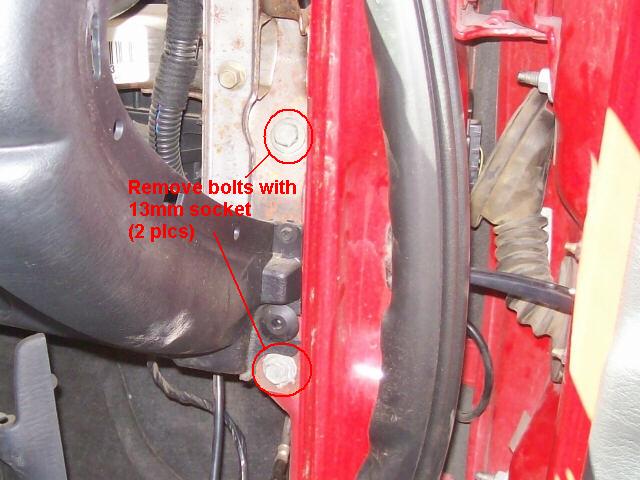
The dash is connected to the floor at the center of the car by two bolts with 13mm heads. They're pretty close to the tunnel and a bit hard to see at first.
I found I had to cut the tie-wrap that secures the shift lock cable to the left side ventilation duct. I replaced the tie-wrap with a new one on reinstallation.
At this point you remove the HVAC control panel's two screws, and disconnect its electrical and vacuum connections. Then you turn the HVAC panel 90 degrees clockwise (as seen from above) and push it back through its opening.
Then you can remove the dashboard assembly. I found I could do it solo by sitting in the middle of the car straddling the right and left seats. You will have to give a bit of a tug on the left edge to unseat the halves of the huge electrical connector there. As you pull the dash aft, go slowly and carefully and check that there are no forgotten wires or hoses. You also have to herd the HVAC panel through its tunnel as you draw the dash away.
The car looks pretty desolate without the dash or steering wheel. Note the big white electrical connector near the left A pillar. It plugs into a matching connector anchored to the frame of the dashboard. When you put the dash back in, you have to push it straight back in so that the connectors engage. I didn't have any trouble with it, but I don't know how forgiving it is.
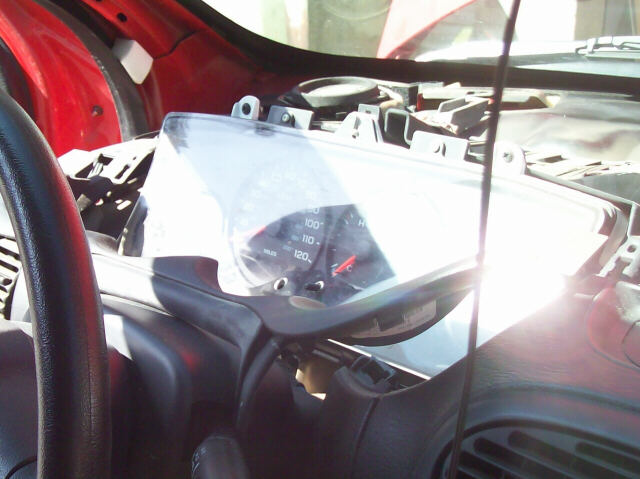
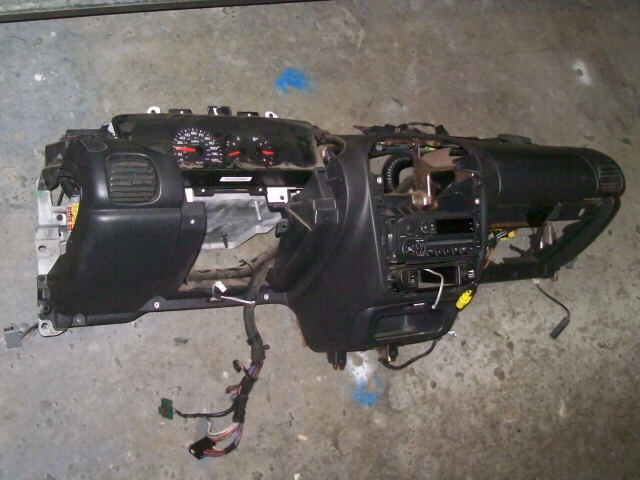
The dash looks pretty strange without a car wrapped around it. Note that the speedometer is off its peg. I didn't notice that until after I looked at the photos. It works fine regardless.
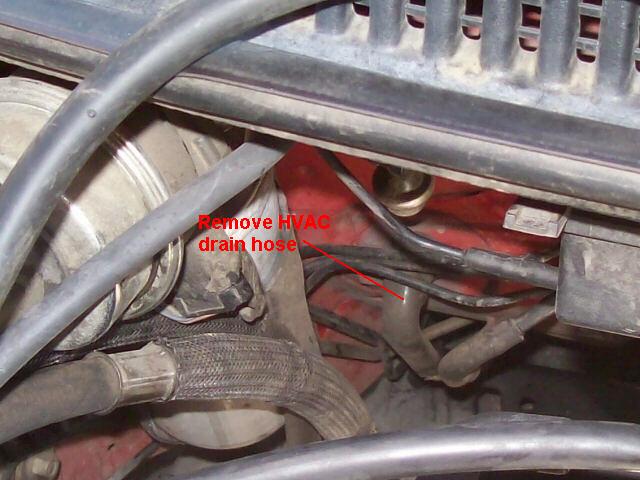
Now you start removing the HVAC unit. Start by pulling its drain hose off the forward face of the firewall.
Then remove the nuts from the three studs that secure the HVAC box to the firewall. The rightmost one (right side of the car, that is) is behind the AC plumbing, and is hidden by a fuel line support bracket that is pushed on over the HVAC box stud. Use your trim fork to pry the fuel line support off the stud, then remove the nut. During reassembly, I found it easiest to loosen the cruise control servo to make room to get my hand back there, so you might as well do that during disassembly.
The center stud is pretty easy to see, it's all on its own. The leftmost stud (car's left) is used to anchor the leftside tab on the coolant reservoir.
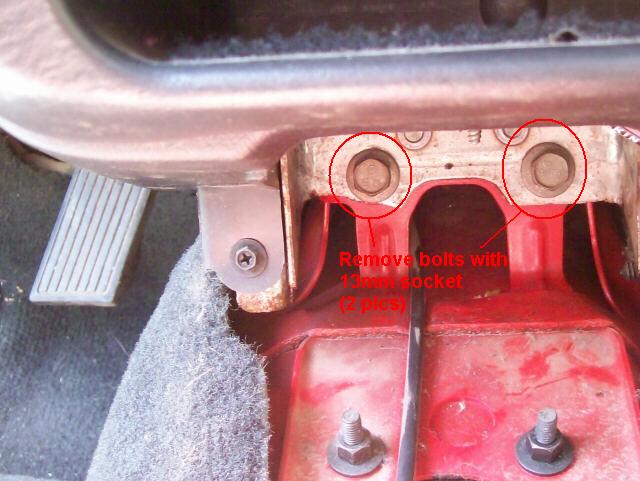
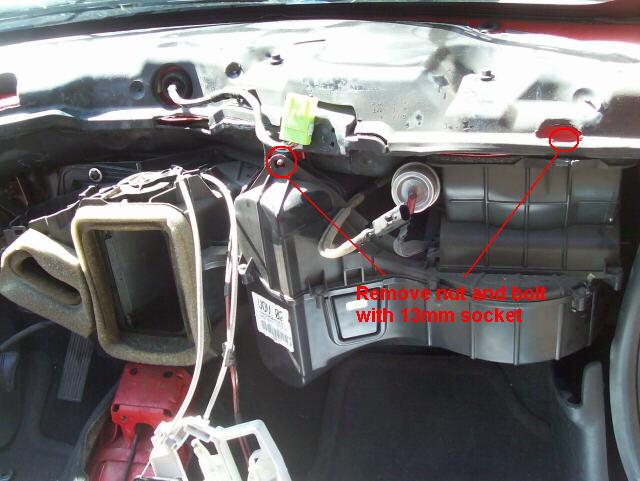
Inside the car, use your 13mm wrench or socket to remove one nut and one bolt securing the HVAC box to the inside of the car.
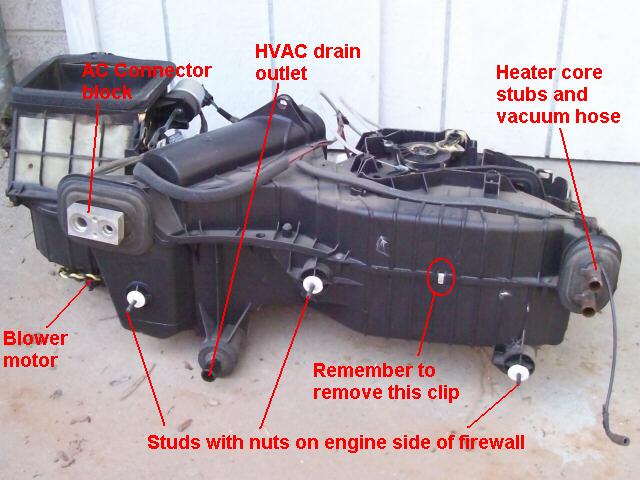
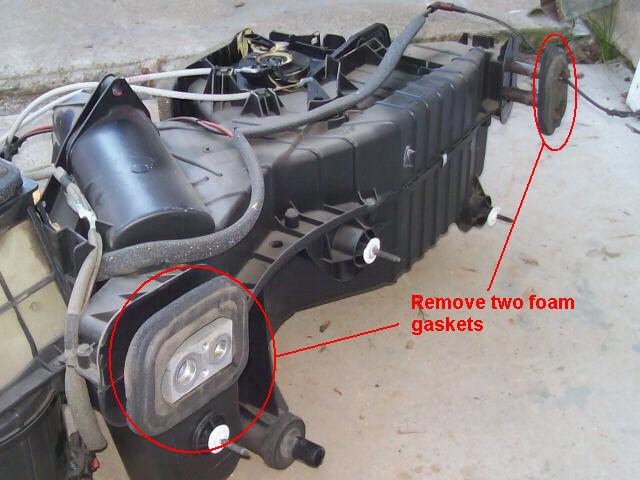
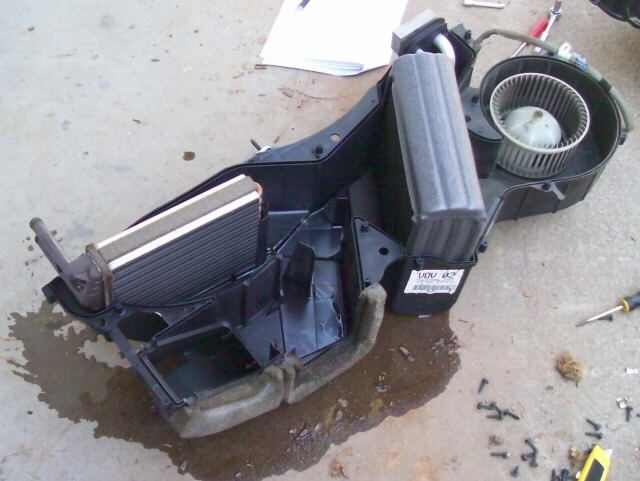
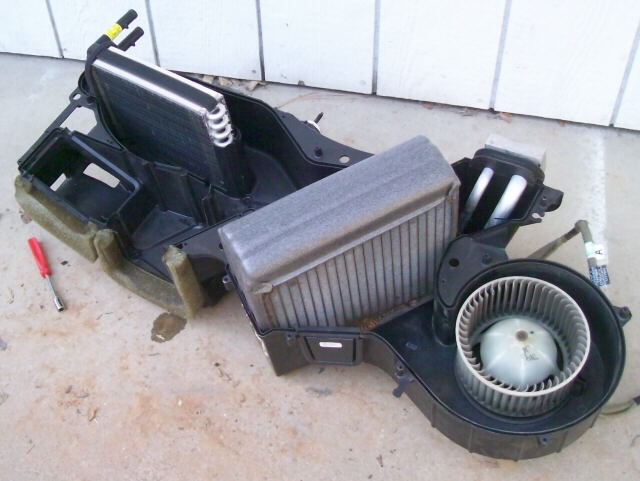
Then you should be able to pull the HVAC unit aft and remove it from the car. This photo shows the features of the aft face of the unit, which faces the cabin.
This photo shows the features on the side of the HVAC unit that faces the firewall.
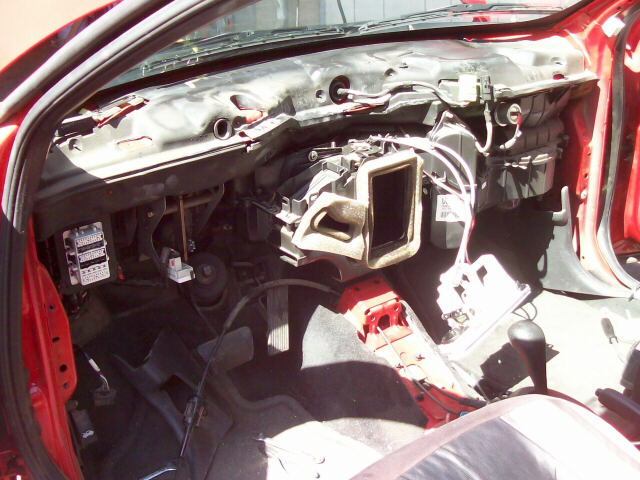
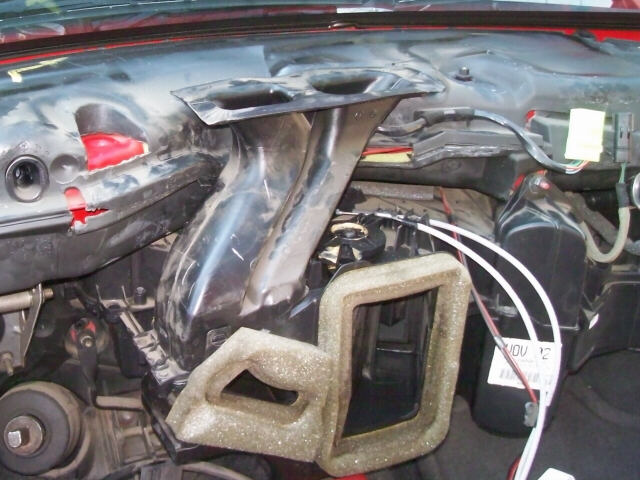
This is what the car looks like sans dash and HVAC unit. If you were going to do some SCCA or 24 Hours of Lemons racing, this is where you'd start installing your roll cage.
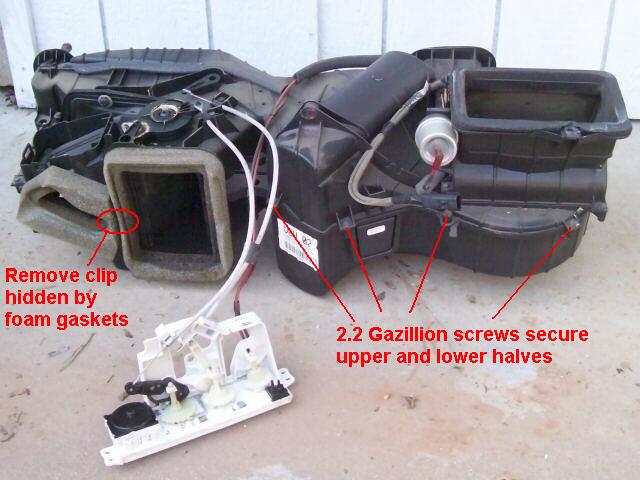
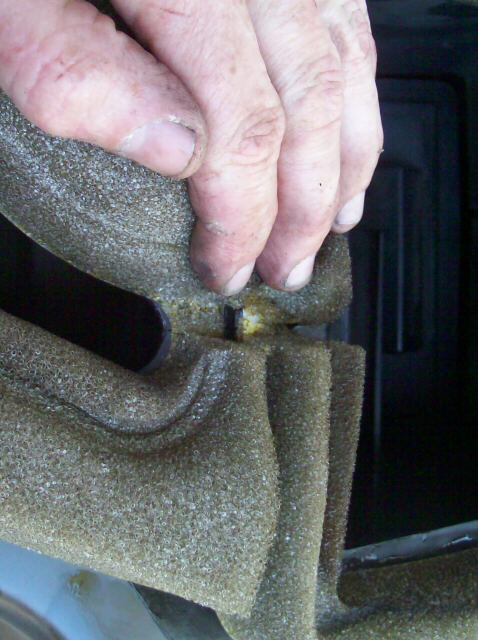
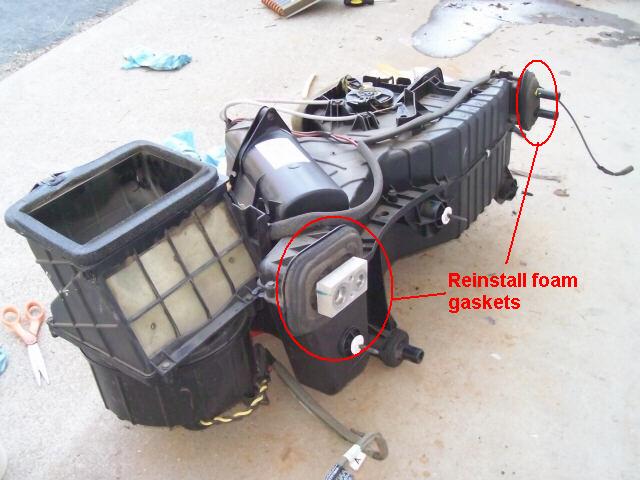
Back to the HVAC box. Find where the parting line between the upper and lower case halves goes through these foam gaskets, and slice through them with a sharp knife. Right between the two openings, right below my middle finger in this photo, dig through the foam to find a hidden clip that holds the two case halves together. Remove (and save, of course) the clip.
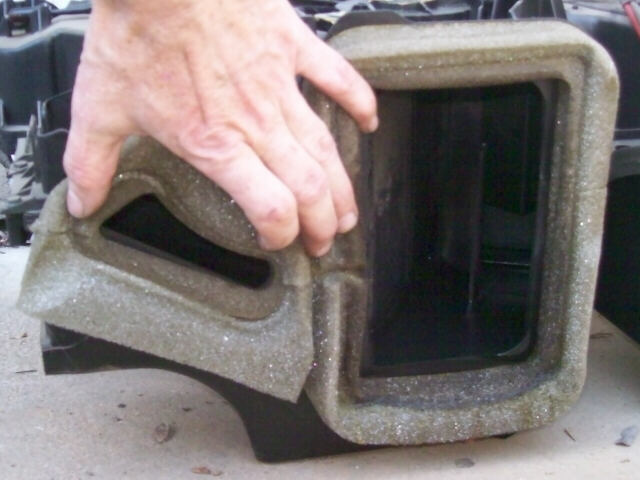
On the firewall side of the HVAC box, remove the foam gaskets from around the heater core stubs and the AC connector block. The one around the heater core stubs will probably come right off, since the adhesive that held it onto the box has long since been baked to oblivion. The gasket for the AC connection will probably still be healthy and you'll need to carefully peel it off.
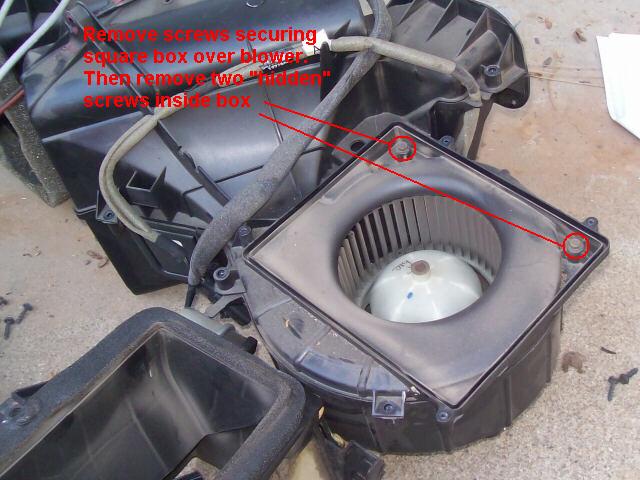
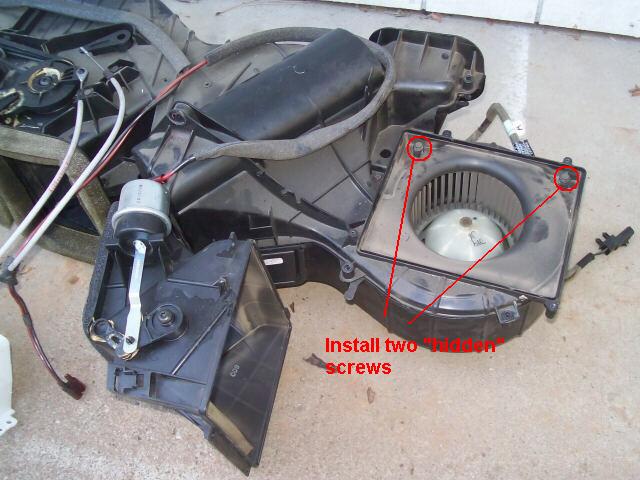
Remove the four or so screws that secure the square box thingy above the blower motor. Then remove the two hidden screws inside the box.
Proceed to find and remove about 2.2 gazillion black screws that hold the top and bottom halves together. A 5/16" or 8mm nutdriver works great for this. You'll know when you've found them all, the case halves will separate easily. If they don't want to separate, look carefully for a hard-to-find screw or clip. For reassembly, I used the nutdriver to install the screws, and then gave each one a last nudge an 8mm socket on the 1/4" ratchet.
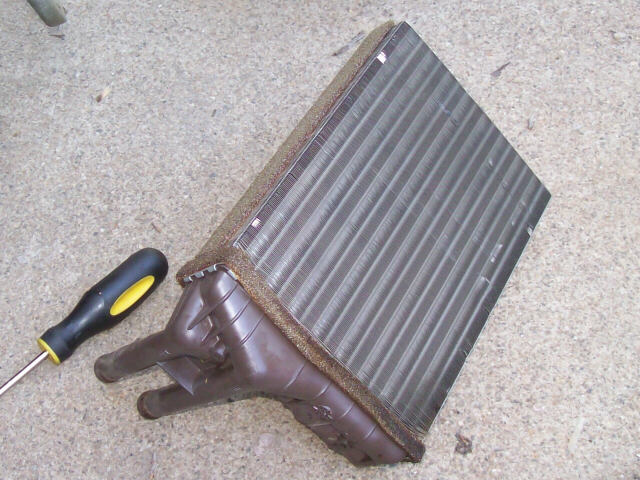
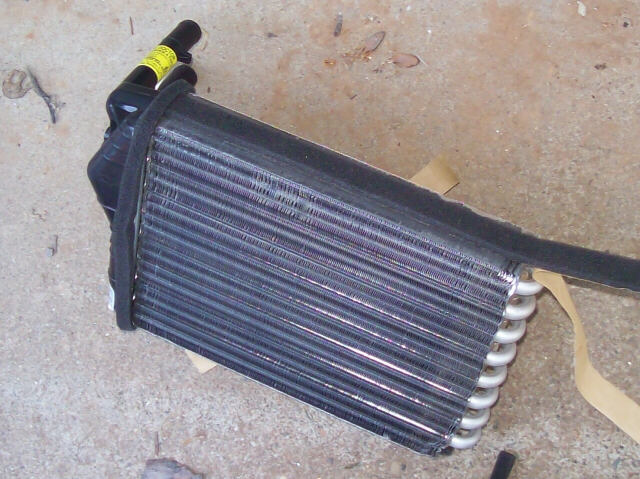
After separating the case halves, lift out the offending heater core and set it aside. Note the weather stripping around the base of the plastic header and down each side of the core. Your replacement core probably comes with some loose weatherstripping and you have to put it on the same way.
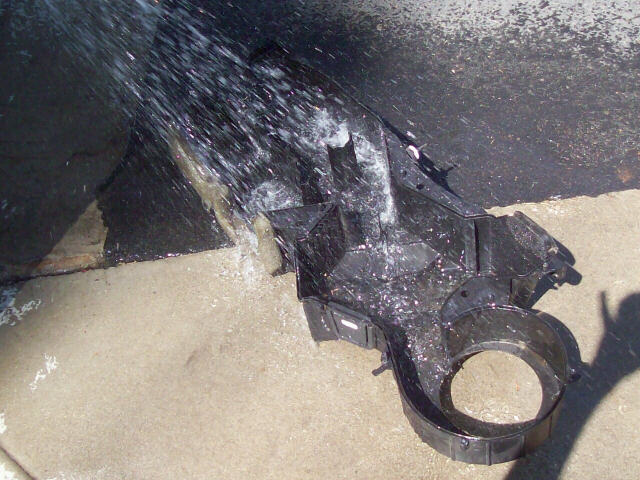
While the HVAC case is open, you can just lift the AC evaporator out, and it's only three more screws to release the blower motor, so you might as well take everything out of the lower case half and take it over to the faucet to wash out the vile antifreeze (and probably antifreeze/ATF mix) that's been leaking out of the heater core.
Here I've put the weatherstripping on the replacement heater core.
And here I've got everything back in the lower case half and I'm ready to put the top back on.
Before you put the square box on over the blower, remember to install the two "hidden" screws.
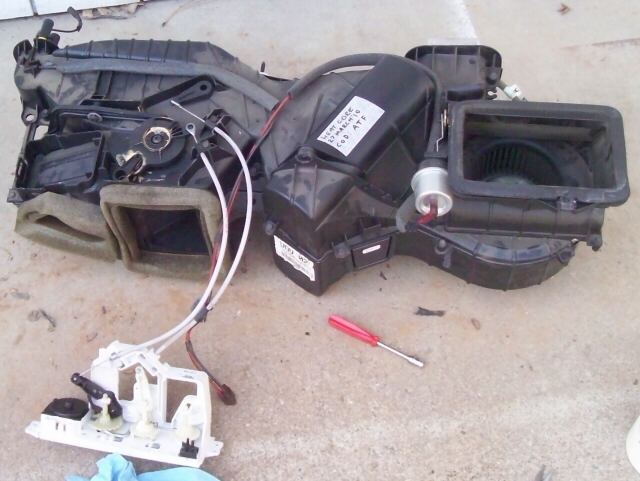
The reassembled HVAC unit. Note that I've put a tag on it identifying the when and why of the repair.
Remember to put the foam gaskets back on the big connections that go through the firewall.
When you put the HVAC unit back in the car, it's a bit of a pain to make all the firewall studs line up, and you have to make sure the vacuum line for the AC controls goes through the opening with the heater core studs.
This is how I kept things under control in the thick of the job. Every time I removed a couple of nuts or screws or bolts or a small part, I put them in a labeled baggie. If I were to do it again, I'd also write a sequence number on the baggie to help me put things back in the reverse order.
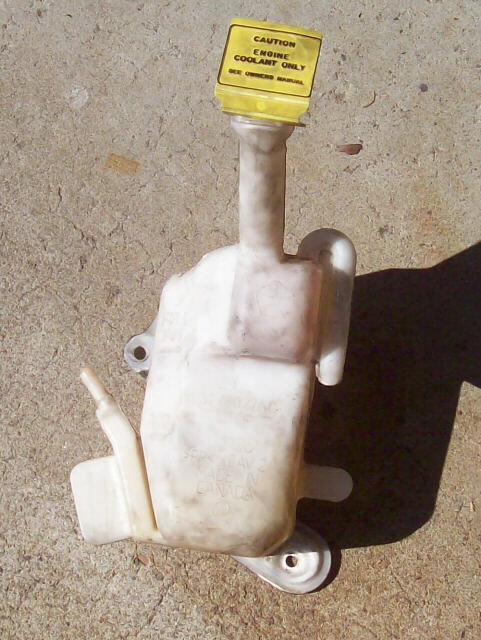
Removing and reinstalling the coolant bottle is a pain. it barely fits between the firewall and the plumbing and the wiring and other stuff in the way. I washed mine off as best I could, and washed my hands before installing it, to make it easier to see the coolant level.
Don't forget to snap the defroster outlet horn onto the HVAC unit before you install the dash. I don't think you can get it into place properly after the dash is installed.
Also, note the nut on a stud just to the right of the top of the horn. That nut is one of two in that area that engage forks on the plastic parts of the dashboard. There were no instructions about them in the service guides, and they let go easily when I pulled the dash out. But for the reassembly, I loosened each nut several turns prior to putting the dashboard back in, and took care to engage them with the forks on the dash. And after the dash was in place I tightened them snugly.
After this, I just plugged the dash back in pretty much the way it came out, and then proceeded to put things back the way I found them. One hitch I discovered was that I'd broke the latching tab off of the square body of the cable connector for the ATX shift lock that goes to the ignition switch. Fortunately, it was perfectly set up so that I could lock it in place with a tie-wrap.
After reinstalling the steering column and reconnecting its wiring harnesses, I did a general check to see that I had all of the wiring harnesses hooked back up. Then I reinstalled and reconnected the battery, checking carefully for a larger than usual spark when connecting the last terminal. Then I sat in the driver seat as far from the airbag as I could, switched on the ignition, and started the engine. I got a good start with no unusual lights, no CEL, and no codes!
After that, I installed the center console, the steering column covers, and all of those other interior panels pretty much in whatever order they came to hand. And then sudenly there were no more parts to install and the job was done.
page updated 28 March 2010 all text and graphics copyright (c) 2010 Bob Kuykendall